
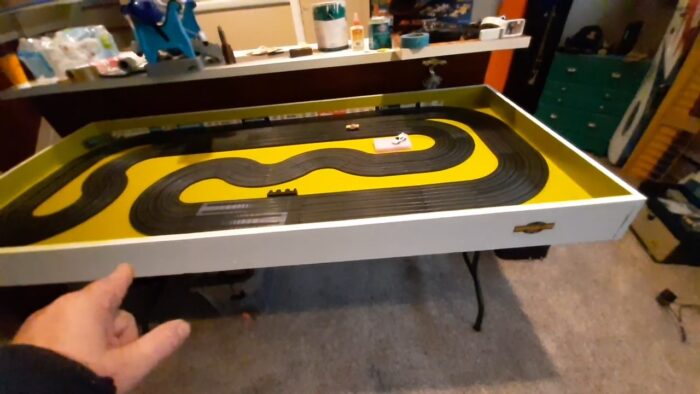
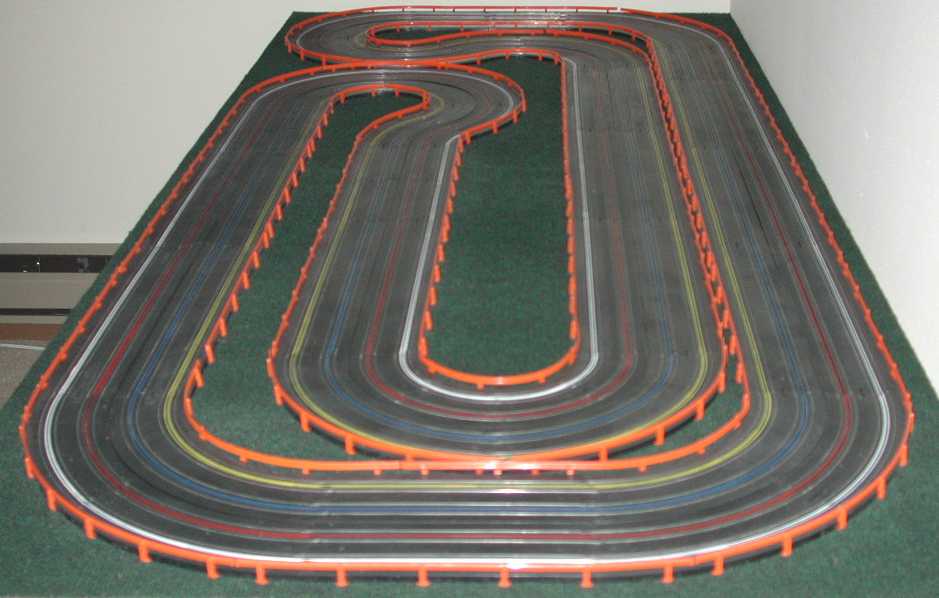
This section describes the construction of the Tuckaway 25 Portable HO Scale Slot Car racing layout. The Tuckaway 25 was designed to fit on a 36″ × 80″ table. It provides a fast, challenging 4-lane racing circuit with a lap length of over 26 feet, yet fits on a standard solid core exterior door.
The Tuckaway 25 was designed to be an easy-to-build HO slot car layout. It uses the Tomy AFX Super International Racing Set as its base with the addition of only four (4) 9″ straight sections and four (4) 15″ straight sections.
The AFX Super International Race Set is the best buy available today in 4-lane HO Scale Slot Car sets. See the Race Sets page for details. Included in the set are two 22 VDC power packs, four (4) AFX hand controllers as well as four (4) AFX Mega-G slot cars. The cars in this set alone often sell for $25.00 or more, making this a great value.
View the Color-Coded layout plan for track section sizes.
Not only is this an easy layout to build, but it can be built for under $275.00 including all building materials, AFX track, power packs, controllers and 4 Super G-Plus slot cars.
Table Construction
The secret to this layout’s ease of construction lies in its simple table construction. The entire table can be assembled in just an hour or two. To construct the table you will need the following items:
- 1 – 36″ × 80″ Solid-Core Exterior Door
- 1 – Pair of Folding Banquet Table Legs
- 7 – Feet of 36″ Stairway Runner
- 2 – Quarts of Outdoor Carpet Adhesive
- 3 – 8 Foot 1″×6″ or 1″×8″ Boards
The 36″ × 80″ solid-core exterior door is available at most home building supply centers and will cost between $45.00 and $50.00. Don’t be concerned about the finish veneer used, as it will be covered by the carpet in a later step. What is important though, is that you purchase a solid-core door. A hollow-core door, while less expensive, will not provide a means of fastening the track to it. You may however be able to purchase a damaged door at an even lower cost. If you do find a damaged door though, make sure it is not warped.
Place the door in a flat horizontal position, using saw horses if available. Position and mount the two folding banquet table legs to the underside. Folding banquet table legs are available at most building supply centers and will cost between $10.00 and $15.00 for the pair. Follow the instructions supplied with the folding legs. Normally these legs are attached to the bottom of the table in their “folded in” position. This assures that they will fit properly when they are folded in for storage.
With the folding legs firmly attached turn the table over and extend the legs. You are now ready to glue the carpet to the table. Purchase a 7 foot length of Hunter or Forest Green stairway runner. Most building supply centers sell this type of carpet for $2.00 to $3.00 a linear foot. Purchase carpet that is at least 36″ in width. Chose carpet that has a tight, short weave and a dark green color. If you purchase a 36″ wide strip of carpet make certain that it is at least 36″ wide. This carpet, while sold as a 36″ width, is typically 36 ½” wide. That is fine, as you will be trimming the edges later so that they are flush with the table’s edges.
Apply the outdoor carpet adhesive to the entire table top using a trowel with a 1/8 inch serrated edge. Work quickly as the adhesive will start to dry in 15 to 30 minutes depending upon the ambient air temperature. You will definitely need a trowel for this operation, no other tool or implement will work here. Carefully position the carpet on the adhesive and smooth it out before the adhesive has a chance to dry. A kitchen rolling pin makes a good tool for smoothing out the carpet before the adhesive cures. Covering the table top with carpet will dampen the track and greatly reduce the click-clack sound normally associated with plastic racing layouts mounted directly to a wood base. The dark green color also provides for a realistic looking, professional finish.
Let the carpet adhesive dry completely before trimming. This normally takes about 24 hours. Once the adhesive has dried you can trim the edge. Use a brand new blade in your utility knife and cut the carpet flush with the table top. The table top itself makes a good knife guide and will assure a smooth, even edge.
Retaining Wall
With the carpet trimmed you are ready to apply the finishing trim to the edge of the table. Cut two lengths of 1″×6″ or 1″×8″ dimensional lumber to fit along the long sides of the table and fasten them with standard finishing nails. Cut the remaining 1″×6″ or 1″×8″ board into two 3 foot lengths and nail these to the short ends of the table top. You should use wood glue as well as finishing nails to firmly secure the retaining walls to the table’s edge.
At this point you have a completed table suitable for mounting your HO raceway. This table will be very solid, and will provide for a quiet running racing layout. Fold up the legs and it will be small enough to be easily stored against a wall or under a bed. If your raceway is to be stored under a bed and you’re using a retaining wall make sure the 1×6 or 1×8 retaining walls will slide under the bed frame.
Track Mounting
Assemble the entire layout on the table using the Tuckaway 25 layout design sheet. Don’t nail the track down yet. The layout will fit on the table with a 1½ inch border along each of the long sides of the table and a 1 inch border on the two short ends.
With the track assembled and properly positioned on the table top test it. Run your slot cars for a while and get a feel for the layout. Make certain that all track sections are properly joined and that the joints do not have any large bumps or gaps. Attach the guard rails where they will do the most good. Once the track is attached to the table top you will not be able to move them easily, so use this opportunity to test various guard rail locations.
Once you are certain that all track sections are properly joined you can begin to actually attach the track to the table. Use ¾ inch No 17 nails with a full flat head. Do not use finishing nails. Finishing nails do not have a large enough head and will allow the track to eventually work itself loose. See the Track page to purchase Track Mounting Nails if you can’t find them locally.
Each section of AFX track has a small nail hole at each end. Use each and every nail hole provided to securely mount the track to the table top. Use a nail set to drive each nail home as it nears the track surface. When a nail is flush with the track’s surface use the nail set to drive the nail in just a bit further. Each nail head should form a small dimple were it meets the track. Do not concern yourself with these dimples, as they will be removed in the next step of construction. When mounting the track also make certain that there are no gaps between the inner and outer track sections that make up the 4-lane width of the layout.
With the track firmly attached to the table you need to remove the dimples created by the previous track mounting step. To do this, use a small soldering iron with a pencil tip. That is, a tip that comes to a point. Do not use a flat tip with an end like a screw driver. The tip must be round and come to a single point at its end.
Place the heated soldering iron tip on the top of each nail head and hold it there until the nail head is sufficiently heated. As the nail head heats up it will melt the plastic surrounding it and allow the track section to pop back up to its normal height. This will create a perfectly countersunk nail hole and restore the track to its normal flat position.
Repeat this process for each nail securing the track to the table top. If you find that you didn’t drive some of the nails in deep enough use your nail set to further seat the nails before using the soldering iron.
A Permanent Black Sharpie Marking Pen can be used to “paint” the heads of the countersunk mounting nails. Coloring the nail heads black will make them all but disappear and give your racing layout a very professional appearance.
You are now finished with track construction, just connect the power supplies and controllers to the terminal tracks and you are ready for years of trouble free slot car racing fun.
See the For Sale page for a complete turn-key kit of everything needed to build this track, except for the table itself.