
Ted Gowder, a regular visitor to this web site sent me some pictures recently of a 4-lane routed wooden HO raceway that he and several of his friends built. He has graciously allowed me to share these pictures, and the construction techniques he used to build this magnificent track.
Note: Ted has asked that I not give out his email address, so please don’t ask me for his contact information. The information provided below should allow anyone with basic woodworking and routing skills to build a track using his simple techniques.

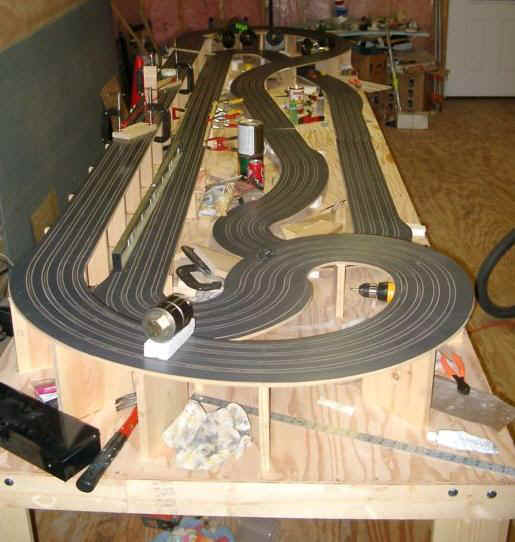
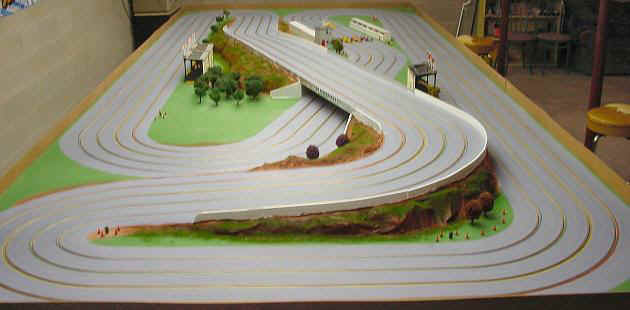
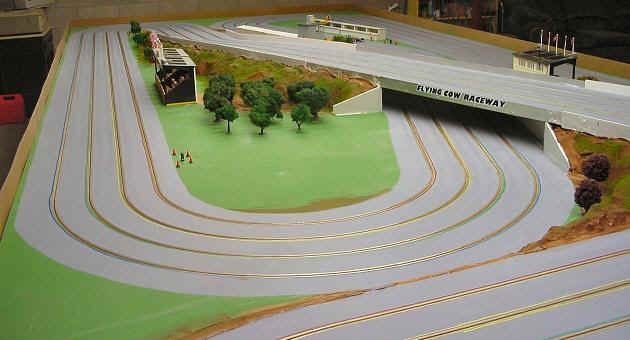
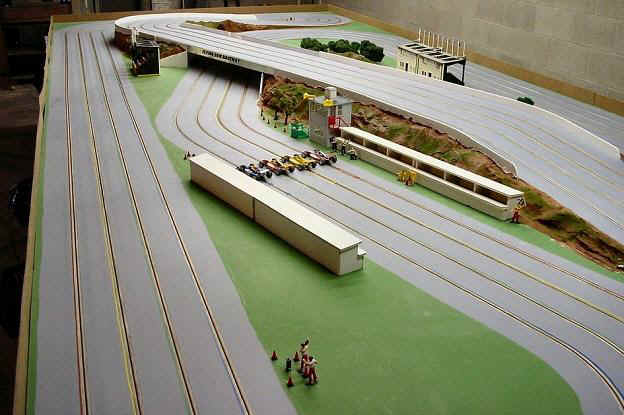
The two photos above show the painted and elevated track before the steel power rails have been pressed into place.
Two 4×8 foot sheets of 3/4 inch MDF were routed and placed end-to-end. A 1×4 framed table with 1/2 inch plywood forms the base for the elevated MDF track itself.
Construction
The track was very inexpensive to build. Most of the expense involves the time required to actually build it. Anyone with basic woodworking skills should be able to complete the project in 3 or 4 weekends.
A good quality router and a lot of patience are all that’s needed to route the guide pin slot and the power rail pockets on either side of the slot.
Undoubtedly, the most difficult part of creating a routed wooden HO raceway is fitting the steel power rails. Most other techniques involve routing a wide pocket to fit a flat steel rail and then a thin strip of plastic wedged in next to it to hold the rail in place. This method is tedious at best and often results in a track with very uneven rail heights.
Ted’s unique approach to this common problem was to route a shallow pocket and simply press black annealed rebar wire into the routed slot. The wire he used is highly magnetic, and almost black in color. Prior to pressing the annealed wire into the slots he painted the entire raceway a dark gray. The dark gray racing surface combined with the dark rebar wire creates a very attractive track.

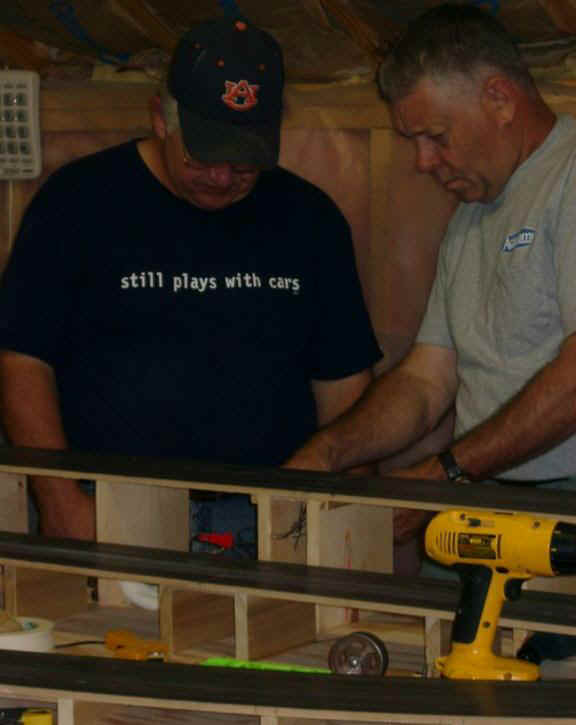
The rebar wire used for the power rails comes in 100 foot rolls, enough to do one entire continuous power rail around the whole track. A 4-lane track will require eight (8) 100 foot rolls of 16 gauge rebar tie wire. That’s two rolls per lane, one for each power rail. The wire can be pressed into place using a hard wooden roller. Earlier attempts using a hammer to seat the power rails resulted in flat spots in the wire. A roller was found to work the best.
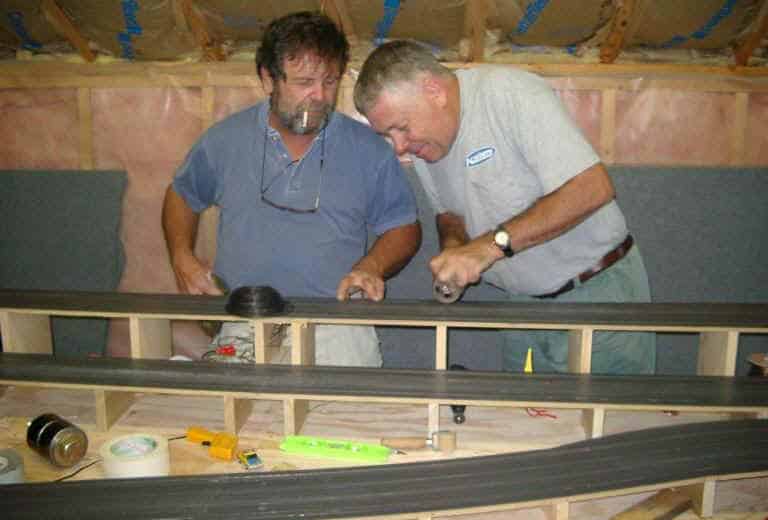
The picture above shows the track power rails being pressed into place using a small wooden roller.
Track Supports
Regular 1×10 dimensional lumber was cut to varying heights to elevate and support the entire raceway approximately every running foot. MDF is fairly flexible, so variations in elevation can be incorporated to create a track with more visual interest.
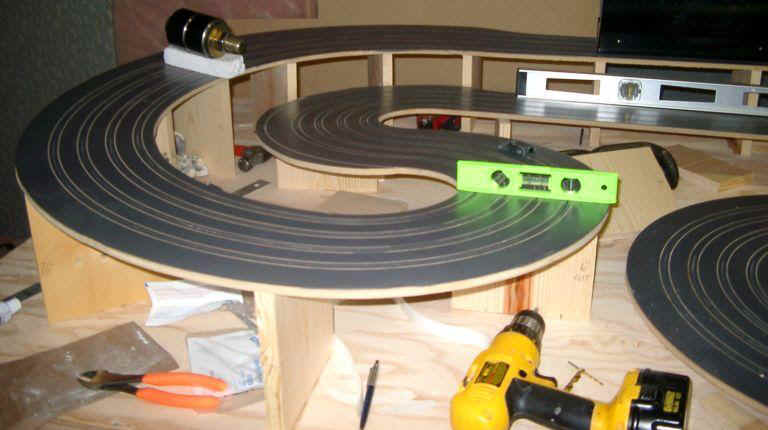
The 1×10 supports were cut with a very slight angle at the top to create a gentle banking towards the inside of each and every turn on the track. Countersunk flathead wood screws were used to secure the routed MDF to the elevated supports. Bondo was then used to fill the screw holes prior to painting.
Routing
A single tungsten high speed 1/16″ router bit can be used to cut both the guide pin slot and the power rail pockets. 16 gauge rebar tie wire, available at Home Depot or Loews can be pressed into the rail pockets using a wooden roller.
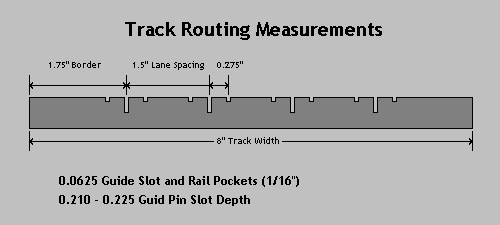
Test the router bit depth on a scrap of MDF to get the proper rail pocket depth. The rebar wire that’s pressed into the slot needs to be approximately 0.005 to 0.007 above the racing surface.
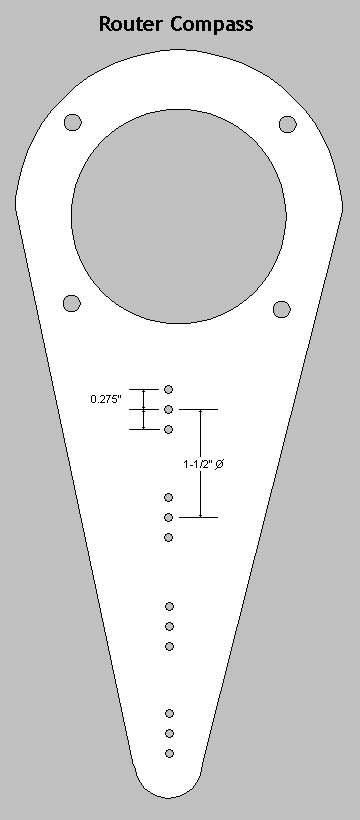
Router Turn Compass
Cut the slots for all of the turns first and then join them by routing the straights so they match up with the turns. A simple router compass can be fabricated from Plexiglas or hardboard to help route the turn slots.
Drive a pin at the center of each turn you plan to cut and then move the compass so that it pivots on this pin. The diagram below illustrates how a compass can be made. The drawing is not to scale and will actually be much longer than shown and would normally have 12-20 sets of pivot points for varying turn radius sizes.
Power Taps
Drill a small hole next to the rail pocket, just large enough to thread a 14 gauge stranded wire up from the underside of the track. Press the rebar wire in place to pinch the power tap wire and then solder the joint for a good electrical connection. Trim and file the solder joint and then put a dab of the same gray paint you’ve used for the track surface to all but hide the power tap points.
Landscaping
The elevated track support system used for this routed wooden track is very similar to what model railroading hobbyists use for their fully landscaped layouts. There are a multitude of good model railroading landscaping books and web sites that can give you plenty of ideas for landscaping your wooden raceway.

Woodland Scenics makes an entire line of light-weight landscaping products for model railroads and museum dioramas that are ideal for landscaping an HO raceway.

Carved Styrofoam sheets painted with an acrylic wash will make very realistic rock faces.
Pilot Layout
Ted recommends that you build a small pilot track first before diving into a big 4-lane monster like the one described above. You can practice your router technique and woodworking skills on a small 2×4 foot piece of MDF. Try making a small 2-lane oval to familiarize yourself with the routing, rail laying and painting techniques required to build a routed wooden track.
You can learn from your mistakes on this smaller layout before you commit to a larger raceway. All of the techniques you use to build your small test track will apply to the larger final track you build later on.
1:32 Scale Routed Wood Track
The pictures below show a beautiful 1:32 scale routed wooden track built by James Butt. This particular track is 8×20 feet in size, but could easily be reduced in size to become a smaller HO scale raceway.
The long straights and smooth turns make this a great track to race on.
Scenery, structures and landscaping have been kept to a minimum, so as not to distract the eye of the racers. Sight lines are good and the table is low enough to allow seated or standing drivers to view the entire layout.
See the Layouts section of this web site for a Tomy plastic sectional track version of this raceway that fits on a 5’4″×12′ table.